| View previous topic :: View next topic |
| Author |
Message |
58 MOR
I can do it
Joined: 14 Nov 2011
Posts: 27
Location: Wellington Point
|
 Posted: Mon Nov 14, 2011 6:22 pm Post subject: Posted: Mon Nov 14, 2011 6:22 pm Post subject: |
 |
|
| Very nice kel, especially like the exhaust.
|
|
| Back to top |
|
Kel
我能行
Joined: 31 Mar 2008
Posts: 462
Location: Hunter Valley
|
| Posted: Mon Nov 14, 2011 6:36 pm Post subject: |
|
|
Thank you 58 Mor
I did notice your stack / exhaust on your pictures.
I have twin side pipes. They were hand made and designed by myself.
To keep the noise low, I have a standard muffler and then two hotdogs (one in each side pipe.) This keeps the noise to a comfortable level.
Regards
Kel
|
|
| Back to top |
|
58 MOR
I can do it
Joined: 14 Nov 2011
Posts: 27
Location: Wellington Point
|
| Posted: Mon Nov 14, 2011 8:29 pm Post subject: |
|
|
| Kel wrote: | Thank you 58 Mor
I did notice your stack / exhaust on your pictures.
I have twin side pipes. They were hand made and designed by myself.
To keep the noise low, I have a standard muffler and then two hotdogs (one in each side pipe.) This keeps the noise to a comfortable level.
|
Yeah that was a nice touch from my old man... I have two different systems one of which does dump just in front of the drivers side rear tyre. I prefer the stack because it just stand out a little. As for the comfortable noise level I think that I missed that memo hahaha! I am running gilmer gears so my ute is a little bit noisier than normal.
I am working on a post for in the My Morris thread to explain what i have done to her. There will be plenty of pics from over the last seven years.
|
|
| Back to top |
|
Kel
我能行
Joined: 31 Mar 2008
Posts: 462
Location: Hunter Valley
|
|
| Back to top |
|
stolzie
2nd gear
Joined: 05 Nov 2012
Posts: 62
Location: Gold Coast Australia
|
| Posted: Thu Feb 21, 2013 12:30 pm Post subject: |
|
|
| Wow awesome work so far! I like the exhaust setup and the whole look of the car. I like stripe 2!
|
|
| Back to top |
|
graham
At rest

Joined: 06 Dec 2008
Posts: 744
Location: Wanguri NT
|
|
| Back to top |
|
Kel
我能行
Joined: 31 Mar 2008
Posts: 462
Location: Hunter Valley
|
|
| Back to top |
|
Monk
moderator

Joined: 13 Sep 2009
Posts: 671
Location: Canberra
|
| Posted: Thu Feb 21, 2013 8:52 pm Post subject: |
|
|
| Good job Kel. Looking forward to seeing it at Moss Vale!
|
|
| Back to top |
|
Kel
我能行
Joined: 31 Mar 2008
Posts: 462
Location: Hunter Valley
|
|
| Back to top |
|
BenB
I can steer now

Joined: 26 Sep 2009
Posts: 152
Location: Cobram vic
|
| Posted: Sun Jun 02, 2013 6:17 pm Post subject: |
|
|
kel
Thats impressive
|
|
| Back to top |
|
frosty
moderator

Joined: 23 Dec 2003
Posts: 3831
Location: 4559 near a big pineapple, Qld
|
|
| Back to top |
|
Kel
我能行
Joined: 31 Mar 2008
Posts: 462
Location: Hunter Valley
|
| Posted: Mon Jun 03, 2013 6:28 am Post subject: |
|
|
Frosty,
I can but you would have to tell me more info.
Would you only want MDU on it , or also a small picture of a morrie ?
Which font should MDU be in ?
How many is a "run"
Regards
Kel
|
|
| Back to top |
|
Kel
我能行
Joined: 31 Mar 2008
Posts: 462
Location: Hunter Valley
|
|
| Back to top |
|
Kel
我能行
Joined: 31 Mar 2008
Posts: 462
Location: Hunter Valley
|
|
| Back to top |
|
Kel
我能行
Joined: 31 Mar 2008
Posts: 462
Location: Hunter Valley
|
| Posted: Wed Sep 11, 2013 9:46 am Post subject: |
|
|
After paying a spray painter a lot of money for a new paint job for my morry van, I decided to try numerous ways of protecting the front of the morry from stone chips. I wanted to somehow stop the damage from constant driving on the poor roads,
I started with trying to mould perspex to the shape of the morry. This was extremely difficult for me due to the curves of the morry lowlight front end. I tried many times with paper and cardboard cut outs, and failed to get a good looking design with the perspex.
I purchase two sheets of perspex (acrylic) 350mm square by 3mm thick. I also purchased a sample sheet of 30mm x 100mm x 3mm to practice bending the perspex.

There are many ways to mould perspex, but I have chosen to use an oven and a heat gun.
To practice I filled a tray with hot water and sat the perspex in it. It became flexible but not to the extent that I wanted. I think because the water was not hot enough or the tray made the water cool down too much.

I then filled my coffee cup up with hot water and placed a sheet of 20mm wide into the cup and it moulded very easily.

I then assume that water boils at 100 degrees and the perspex (or the sheets that I have) need about 80-90 degrees minimum to mould it.
Now not knowing too much about paint work, I assumed that 100 degree would sort of damage the new paint work. So I purchased some material that is 2mm thick and can withstand 100 degrees. The material is very pliable so will easily mould to the morry shape. I am not sure what the material is, but maybe felt would also work.
Next, I had to cut the shape out of the perspex. Each morry would be different, I would expect, so my shape may only fit my van.

Next step was to place the heat proof material on the car. The material was held in place with masking tape.
I then got a metal tray big enough to fit the perspex shape into it. I heated the oven up to about 100 degrees. Placed the perspex in the oven and waited approximately 3 minutes.
Once I found the perspex pliable, I used oven mitts to place it on the heat proof material and put pressure on it to mould it to the shape of the lights, mouldings and guards.
I used oven mitts as they are smooth texture. If you use a material with a coarse texture, that texture will be passed onto the perspex.
I could not get the perspex to a nice mould
At this time I went and had a look at the 3M brand, stick on, clear plastic. They needed the car for maybe two days and there was no guarantee that it will be right, but it looked pretty good. The only two concerns that I had were, 1. Will the wrap stay on the car and not fade and 2. The price.
Next trial was the old fashioned car bra. I required the full front guards and grill protection, plus a bikini bra for the bonnet. The concerns that I had were, 1. The car bra not chaffing the paint and 2. The price
After a lot of umming and aaaahhhhing , I chose the car bra.
Both the clear plastic and the car bra were priced around $800
The pictures show the front view and the side view.


This maybe not, to everyones taste, but I was more concerned with the price I paid to repair all the stone chips with a new paint job.
Regards
Kel
|
|
| Back to top |
|
BCH8OY
I can steer now
Joined: 24 Sep 2009
Posts: 144
Location: Berowra Heights
|
| Posted: Wed Sep 11, 2013 1:33 pm Post subject: Your External Mirrors |
|
|
Hi Kel,
I couldn't help but notice on your wonderful restoration, the mirrors you have used.
I'm looking for exactly the same style and size for my Morrie ute. Now that I have limited movement in my neck , the ones you have used would be perfect for me.
Are you able to let me know where I can buy the same, and an indication of the price I may have to pay ?
Thanks,
Malcolm Wood (BCH8OY)
|
|
| Back to top |
|
Kel
我能行
Joined: 31 Mar 2008
Posts: 462
Location: Hunter Valley
|
| Posted: Wed Sep 11, 2013 1:52 pm Post subject: |
|
|
Malcolm
It took me four different designs and a lot of trial and error.
Look at page one on the same thread and it describes how I started and how I finished.
The mirrors are the easy part. Making the extensions was the time consuming parts.
I wanted to be able to see behind, with as little vibration as possible.
Regards
Kel
|
|
| Back to top |
|
Kel
我能行
Joined: 31 Mar 2008
Posts: 462
Location: Hunter Valley
|
|
| Back to top |
|
Kel
我能行
Joined: 31 Mar 2008
Posts: 462
Location: Hunter Valley
|
|
| Back to top |
|
Monk
moderator
Joined: 13 Sep 2009
Posts: 671
Location: Canberra
|
| Posted: Wed May 20, 2015 8:42 pm Post subject: |
|
|
Ah, you're a clever fella. All this time thinking in China, eh?
D
|
|
| Back to top |
|
Dutchy
Thanks ~ nice to be here
Joined: 26 May 2015
Posts: 10
Location: Warrnambool-ish
|
| Posted: Thu May 28, 2015 10:55 pm Post subject: |
|
|
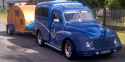
| Damn that's a nice rig. It must be handy having access and skills to run the mill. Jealous. I think I'm going to thoroughly enjoy seeking inspiration by running around here looking at everyone else's efforts.
|
|
| Back to top |
|
Kel
我能行
Joined: 31 Mar 2008
Posts: 462
Location: Hunter Valley
|
|
| Back to top |
|
palpuppyfood
Got the keys
Joined: 02 Oct 2015
Posts: 41
Location: Newcastle
|
| Posted: Sun Oct 04, 2015 12:28 pm Post subject: |
|
|
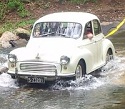
| Thats a great looking van mate, love the look of the lowlight. Mal.
|
|
| Back to top |
|
Kel
我能行
Joined: 31 Mar 2008
Posts: 462
Location: Hunter Valley
|
| Posted: Sun Oct 04, 2015 12:45 pm Post subject: |
|
|
| Thank you Mal. I was eyeing off your ute.
|
|
| Back to top |
|
Monk
moderator
Joined: 13 Sep 2009
Posts: 671
Location: Canberra
|
|
| Back to top |
|
|